Microsoft Exchange Server has become extremely popular in most organizations for seamless email exchange and communication. It enables users to work collaboratively, share, and work on the same domain. It stores all the server mailbox data in Exchange Database file or EDB. This file stores all the messages, notes, contacts, and other mail items.
Sometimes, situations arise when you need to import EDB into Exchange 2016 or any other version. Some of the common scenarios include:
- To access the data when the Exchange database cannot be mounted.
- To access contents of the mailbox from dismounted or orphaned database file.
- To transfer mailbox data to a new Exchange Server database.
- To access the archive, shared, or public folder data separately from the primary mailbox.
How to Import EDB into Exchange 2016?
You can follow the below methods to import EDB file into Exchange 2016.
Method 1: Use Hybrid Migration Method
This is one of the most efficient methods to import EDB into Exchange Server. You can migrate over 2,000 mailboxes. Before proceeding, you need to ensure that the user you’re using has all the required permissions and hybrid deployment is configured between Exchange Server and Exchange Online. Now, follow the steps below:
Step 1: Migration Endpoint Creation
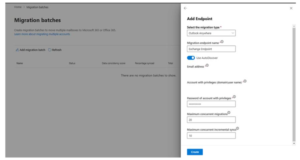
Create a migration endpoint that includes connection settings for Exchange Server that runs the Mailbox Replication Proxy Service (MRSProxy). Follow the below steps to create migration endpoint:
- Open Exchange Admin Center in Microsoft 365.
- Go to the Migration option.

- Click Add in the next window.

- Select the migration endpoint type. You can choose the Exchange Remote

- Click Next. A new window will open where you need to provide the Exchange Server credentials. Provide the necessary details, like email address and password.
- Click Create to create the Exchange migration endpoint.

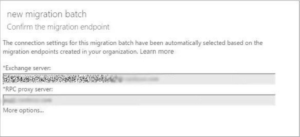
- After providing the details of Exchange Server, the migration connection setting will be selected automatically based on migration endpoints.
- Click Done.
- Enter the name of migration endpoint and leave the RPC Proxy Server and Exchange Server rows empty.
- Enter New to create migration endpoints.

- Run the below command to check the migration endpoint connection in PowerShell. Test-MigrationServerAvailability -Endpoint endpoint.xyz.com
Step 2: Enable Proxy Service
MRSProxy is enabled by default in the Exchange Server. But if it is not enabled, you need to enable it manually. Follow the below steps to enable the proxy service:
- Open Exchange Admin Center and go to Servers.
- Select EWS Virtual Directory from the dropdown menu.
- Click Edit.

- On the EWS window, click General and then click Enable MRS Proxy endpoint checkbox.
- Click Save and then click OK.

Step 3: Migrate Mailboxes to Exchange Online
Now, you can move the EDB file to Exchange Online using the Exchange Admin Center (EAC). The remote migration option can be used to move the EDB mailboxes to Exchange Online. Follow the below steps:
- Open Exchange Admin Center and go to Office 365.
- Click Recipients > Migration.

- Click Add and choose the Migrate to Exchange Online option.
- In the next window, select Migration Type and choose Remote Move Migration Click Next.
- In the newly opened window, click Add and select the On-Premises User. Click Add > OK > Next.
- In the Enter Windows User Account Credential window, provide on-premises admin account credentials. Click Next.
- In the new window, verify if the FQDN (fully qualified domain name) of Exchange Server is listed.
- Enter the name of migration batch in the ‘New migration batch name’ field.
- Select Target delivery domain for mailboxes that need to be moved.
- Check if the ‘Move primary mailbox and the archive mailbox’ option is selected.
- Click the Start the Batch option and select the recipient. Also, ensure the ‘Automatically start the batch’ option is selected.
- Select ‘Automatically complete the migration batch’ and click New.
Step 4: Remove Batches
Now when the mailboxes are moved to Exchange Online, the batches need to be removed. Follow the below steps:
- Open Exchange Admin Center and go to Office 365.
- Click Recipients > migration.
- Click Completed Migration Batch and click
- Click Yes to confirm.
Limitations of Hybrid Migration Method
The Hybrid migration method is effective but it has various limitations, such as:
· It is very lengthy and time-consuming
· Requires technical knowledge
· Can be used with Exchange Server 2010 and later versions
Method 2: Use a Professional EDB Converter Tool
For easy and quick import of EDB data into Exchange Server, you can use a professional EDB converter tool, like https://stellarinfo.com/ Converter for EDB. The tool is enriched with many useful features that facilitate import of EDB data directly into a live Exchange Server database. Some major benefits of Stellar Converter for EDB include:
- Import EDB into Live Exchange or Office 365
- Preview option before conversion into other formats
- Option to convert EDB into various formats, like PST, HTML, MSG, etc.
- Support Parallel Processing for Faster Conversion
- Free demo version to check the product features and accuracy
Conclusion
You may need to import EDB files into Exchange Server due to various reasons. You can follow the methods mentioned above to import EDB data into Exchange Server. However, the manual method has certain limitations. For quick and seamless import, you can use an advanced EDB converter tool, such as Stellar Converter for EDB. This tool can help you import EDB file data into a live Exchange Server without any hassles.
Similar Posts:
- Office 365: Unable To Access Shared Mailbox?
- The 10 Best TV Converter Boxes
- The 10 Best Digital Converter Boxes – Buying Guide
- What Happens To Exchange Mailbox When Ad Account Is Deleted?
- What Is Symantec Uninstall Password?
- How Do I Change My Primary Exchange Account In Outlook?
- How Do I Uninstall Exchange?
- Office 365: Unable To Access Public Folders?
- Fix Skype Error Communicating With The Endpoint?
- How Do I Empty My Mailbox On My Samsung Phone?